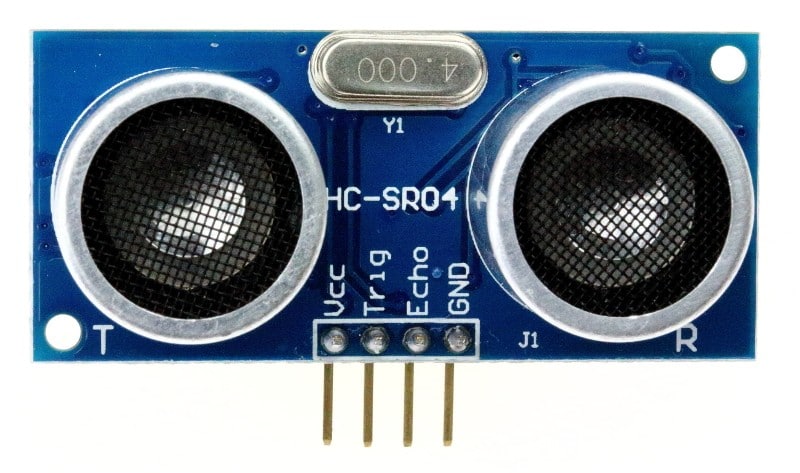
What is ultrasonic sensor
A ultrasonic sensor is an electronic device that actions the distance of an objective article by emanating ultrasonic sound waves, and converts the reflected sound into an electrical sign. Ultrasonic waves travel quicker than the speed of discernible sound (for example the sound that people can hear). Ultrasonic sensors have two fundamental segments: the transmitter (which produces the sound utilizing piezoelectric gems) and the collector (which experiences the sound get-togethers has gone to and from the objective).
To ascertain the distance between the sensor and the item, the sensor estimates the time it takes between the emanation of the sound by the transmitter to its contact with the recipient. The equation for this computation is D = ½ T x C (where D is the distance, T is the time, and C is the speed of sound ~ 343 meters/second). For instance, if a researcher set up a ultrasonic sensor focused on a crate and it required 0.025 seconds for the sound to ricochet back, the distance between the ultrasonic sensor and the case would be approximatly:
D = 0.5 / 0.025 / 343
Application of ultrasonic sensor in internet of things (IOT)
IoT ultrasonic sensors are intended for non-contact discovery of strong and fluid items. These sensors are utilized for a wide assortment of capacities from checking the degree of water in a tank to liquid distinguishing proof/focus, to recognizing object vicinity. Ultrasonic sensors have gotten imperative for IoT conveyance and are broadly utilized for building savvy, associated items. See more about the various sorts of sensors, how they work, and their applications for everything from shrewd vehicle inversion frameworks to keen waste receptacles.
How Ultrasonic Sensors Work
Ultrasonic transducers convert ultrasound waves to electrical signs and the other way around. These gadgets work on a standard like that utilized by transducers in radar and sonar frameworks, which assess the qualities of the objective article by preparing the reverberation signals from radio or sound waves, individually. Ultrasonic sensors comprise of two sections: a transmitter and beneficiary, which make a transducer that changes over ultrasound waves into electrical signs (A/C) or the other way around. The handset vibrates and makes a ultrasonic wave that is sent and goes until it hits an article and is reflected back to the collector. The stretch between the sign being sent and gotten is ordinarily alluded to as season of-flight (ToF) and relies upon the distance the ultrasonic wave goes until it is reflected. The essential condition: time is equivalent to separate isolated by speed, can be utilized to gauge liquid level, liquid recognizable proof/fixation, and distance.
Proximity Sensor
A proximity sensor is a sensor that identifies the presence of nearby objects without requiring physical contact. Ultrasonic sensors are typically used as a proximity sensor, setting a threshold distance which can determine whether an object is an obstacle. This kind of proximity sensor is commonly used in the robotics industry.
Distance Measurement
Ultrasonic sensors are ideal tools for measuring distance without requiring contact with the object and are an efficient method of precisely measuring small distances. As the distance from the object is proportional to the time interval between transmitting and receiving signals, a simple analysis of this data can reveal changes in the sensor’s distance to the object.
Connecting ultrasonic sensor using Arduino
Parts needed
Ultrasonic sensor
Bread board
Arduino Uno
Hookup wire
The Schematic
This helpful little graph shows how we will interface everything. Just sit back and relax assuming it looks somewhat overpowering, we will be going through this bit by bit!
Beginning the code
Since we have done the hookup, we want to begin thinking of some code. We will utilize the Arduino IDE, which is accessible
Writing the code
[code]
int trig_pin = 6; // global variable
int echo_pin = 7;
void arrangement() {
// put your arrangement code here, to run once:
pinMode(trig_pin, OUTPUT);
pinMode(echo_pin, INPUT);
Serial.begin(9600);
}
void loop() {
// put your main code here, to run repeatedly:
float duration, distance;
digitalWrite(trig_pin, HIGH);
delayMicroseconds(2);
digitalWrite(trig_pin, LOW);
duration = pulseIn(echo_pin, HIGH);
distance = ((duration/2)/(29.1));
Serial.print("Distance: ");
Serial.print(distance);
Serial.println(" cm");
delay(100);
}
[/code]
Upload The Code And Test
Now that all of the code has been written it can be uploaded to your Arduino! Click “Upload” button in the top left corner of the Arduino IDE and it should upload without any issues. Next, click the “Serial Monitor” button in the top right corner (it looks like a magnifying glass). After seconds you should start to see a stream of data appear in the window


The code work perfectly well
ReplyDelete