

Programming Accelerometer Using Arduino
This instructional exercise tell you the best way to peruse from the ADXL3xx series (for example ADXL320, ADXL321, ADXL322, ADXL330) accelerometer and get the qualities in the chronic screen of the Arduino Software (IDE) or another application that gets information over the sequential port.
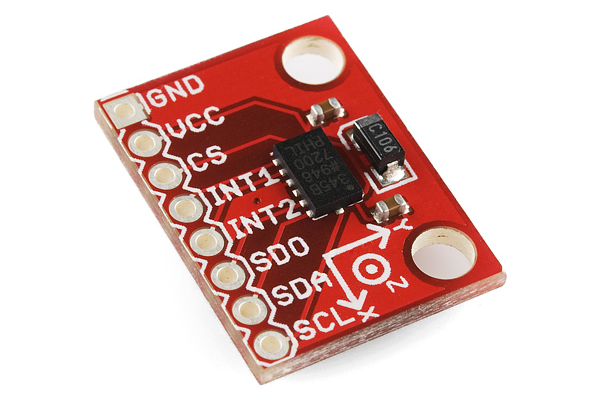
This instructional exercise was fabricated utilizing the breakout sheets from Sparkfun. The adafruit accelerometer breakout board additionally works, however it should be wired in an unexpected way.
The ADXL3xx yields the speed increase on every hub as a simple voltage somewhere in the range of 0 and 5 volts. To understand this, all you need is the analogRead() work.
Equipment Required
Arduino Board
ADXL3xx Accelerometer
Hookup Wires – We suggest Premium Male/Male Jumper Wire
Process:
The process will describe how to connect the Arduino and the accelerometer and then
download the arduino software to program and run the codes.
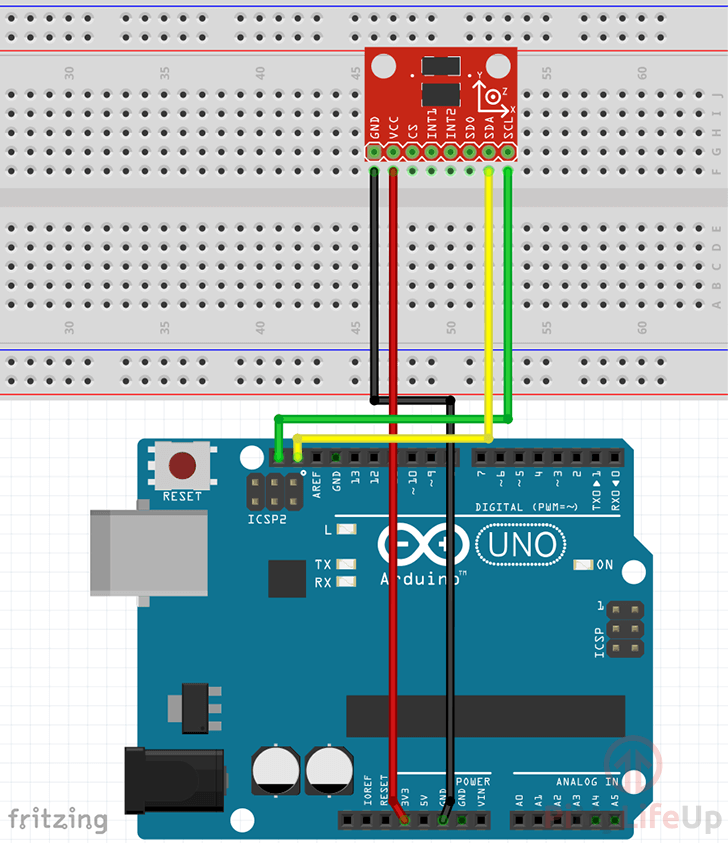
Circuit
The accelerometer utilizes almost no current, so it very well may be connected to your board and run straightforwardly off of the yield from the advanced yield pins. To do this, you'll utilize three of the simple information pins as advanced I/O pins, for force and ground to the accelerometer, and for the individual test pin. You'll utilize the other three simple contributions to peruse the accelerometer's simple yields.
Accelerometer has 5 pins and all of these are connected to Arduino. First connect the GND toArduino’s GND. Then connect the VCC to Arduino’s 5V, X to Arduino's Analog Pin A5, Y to
Arduino’s Analog Pin A4, and Z to Arduino’s Analog Pin A3. Finally the AREF is connected to
3.3v on Arduino to set the reference voltage of ADXL355 to 3.3v
CODE FOR ACCELEROMETER
Before you begin the coding, the Arduino 1.6.6 software needs to be downloaded for compatible
operating system. Opening it up and start writing your code. below is the code:
[code]
#include <Wire.h>
#define DEVICE (0x53) //ADXL345 device address
#define TO_READ (6) //num of byte we are going to read each times (two byte for each axis)
#define offsetX -10.5 // OFFSET values
#define offsetY -2.5
#define offsetZ -4.5
#define gainX 257.5 // GAIN factors
#define gainY 254.5
#define gainZ 248.5
byte buff[TO_READ] ; //6 bytes buffer for saving data read from the device
char str[512]; //string buffer to transform data before sending it to the serial port
int x,y,z;
int xavg, yavg,zavg, steps=0, flag=0;
int xval[15]={0}, yval[15]={0}, zval[15]={0};
int threshhold = 60.0;
void setup() {
// put your setups code here, to run once:
Wire.begin(); // join i2c bus (addresses optional for master)
Serial.begin(9600); // start serial for output
//Turning on the ADXL345
writeTo(DEVICE, 0x2D, 0);
writeTo(DEVICE, 0x2D, 16);
writeTo(DEVICE, 0x2D, 8);
}
void loop() {
// put your main codes here, to run repeatedly:
int regAddress = 0x32; //first axis-accelerations-data register on the ADXL345
readFrom(DEVICE, regAddresses, TO_READ, buff); //read the accelerations data from the ADXL345
//each axis reading comes in 10 bit resolution, ie 2 bytes. Least Significat Byte first!!
//thus we are converting both bytes in to one int
x = (((int)buff[1]) << 8) | buff[0];
y = (((int)buff[3])<< 8) | buff[2];
z = (((int)buff[5]) << 8) | buff[4];
//we send the x y z values as a string to the serial port
// sprintf(str, "%d %d %d", x, y, z);
// Serial.print(str);
// Serial.print(10, byte());
x = ArduinoPedometer();
Serial.println(x);
//It appears that delays is needed in order not to clog the port
delay(100);
}
//---------------- Functions
//Writes val to address register on device
void writeTo(int device, byte address, byte val) {
Wire.beginTransmission(device); //start transmission to device
Wire.write(address); // send register address
Wire.write(val); // send value to write
Wire.endTransmission(); //end transmission
}
//reads num bytes starting from address register on device in to buff array
void readFrom(int device, byte address, int num, byte buff[]) {
Wire.beginTransmission(device); //start transmission to device
Wire.write(address); //sends address to read from
Wire.endTransmission(); //end transmission
Wire.beginTransmission(device); //start transmission to device
Wire.requestFrom(device, num); // request 6 bytes from device
int i = 0;
while(Wire.available()) //device may send less than requested (abnormal)
{
buff[i] = Wire.read(); // receive a byte
i++;
}
Wire.endTransmission(); //end transmission
}
//Get pedometer.
int ArduinoPedometer(){
int acc=0;
int totvect[15]={0};
int totave[15]={0};
int xaccl[15]={0};
int yaccl[15]={0};
int zaccl[15]={0};
for (int i=0;i<15;i++)
{
xaccl[i]= x;
delay(1);
yaccl[i]= y;
delay(1);
zaccl[i]= z;
delay(1);
totvect[i] = sqrt(((xaccl[i]-xavg)* (xaccl[i]-xavg))+ ((yaccl[i] - yavg)*(yaccl[i] - yavg)) + ((zval[i] - zavg)*(zval[i] - zavg)));
totave[i] = (totvect[i] + totvect[i-1]) / 2 ;
delay(150);
//cal steps
if (totave[i]>threshhold && flag==0)
{
steps=steps+1;
flag=1;
}
else if (totave[i] > threshhold && flag==1)
{
//do nothing
}
if (totave[i] <threshhold && flag==1)
{
flag=0;
}
// Serial.print("steps=");
// Serial.println(steps);
return(steps);
}
delay(100);
}
[/code]
you can now verify your code before uploading it to you device.


Leave Comments
Post a Comment
Please leave a message if you find this content very helpful